class  Pyramid

{

public static void main(String[] args)

{

for(int i=1; i<= 5 ;i++)//to print  i values of  5 rows in increasing order

{

for(int j=0; j < i; j++)//to print j values in 5 columns

{

System.out.print(j+1);

}

System.out.println("");

}

}

}
Sunday, July 21, 2013
Java program For print numbers in pyramid Shape using for loop
Bubble Sort Algorithm
Java Code:
Output:
|
1
2
3
4
5
6
7
8
9
10
11
12
13
14
15
16
17
18
19
20
21
22
23
24
25
26
27
28
29
30
31
|
package com.crunchify;
import java.util.Arrays;
/**
* @author Crunchify.com
*/
public class CrunchifyBubbleSortAsce {
public static void main(String[] args) {
int arrayList[] = { 5,3,9,7,1,8 };
System.out.println("\nFinal result:"+Arrays.toString(CrunchifyBubbleSortAsceMethod(arrayList)));
}
public static int[] CrunchifyBubbleSortAsceMethod(int[] arr){
int temp;
for(int i=0; i < arr.length-1; i++){
for(int j=1; j < arr.length-i; j++){
if(arr[j-1] > arr[j]){
temp=arr[j-1];
arr[j-1] = arr[j];
arr[j] = temp;
}
}
System.out.println((i+1)+"th iteration result: "+Arrays.toString(arr));
}
return arr;
}
}
|
|
1
2
3
4
5
6
7
|
1th iteration result: [3, 5, 7, 1, 8, 9]
2th iteration result: [3, 5, 1, 7, 8, 9]
3th iteration result: [3, 1, 5, 7, 8, 9]
4th iteration result: [1, 3, 5, 7, 8, 9]
5th iteration result: [1, 3, 5, 7, 8, 9]
Final result:[1, 3, 5, 7, 8, 9]
|
How to Swap Two Members Without using Temp Variable
package com.crunchify.tutorials;
/**
* @author Crunchify.com
*/
public class CrunchifySwapVariables {
public static void main(String[] args) {
int a = 20;
int b = 30;
int c = 3;
int d = 4;
CrunchifySwapVariables.SwapVairablesMethod1(a, b);
CrunchifySwapVariables.SwapVairablesMethod2(c, d);
}
public static void SwapVairablesMethod1(int a, int b){
System.out.println("value of a and b before swapping, a: " + a +" b: " + b);
//swapping value of two numbers without using temp variable
a = a + b; //now a is 50 and b is 20
b = a - b; //now a is 50 but b is 20 (original value of a)
a = a - b; //now a is 30 and b is 20, numbers are swapped
System.out.println("Result Method1 => a: " + a +" b: " + b);
}
public static void SwapVairablesMethod2(int c, int d){
System.out.println("\nvalue of c and d before swapping, c: " + c +" d: " + d);
//swapping value of two numbers without using temp variable using multiplication and division
c = c*d;
d = c/d;
c = c/d;
System.out.println("Result Method2 => c: " + c +" d: " + d);
}
}
Output:
|
1
2
3
4
5
|
value of a and b before swapping, a: 20 b: 30
Result Method1 => a: 30 b: 20
value of c and d before swapping, c: 3 d: 4
Result Method2 => c: 4 d: 3
|
Write Java Program to Print Fibonacci Series upto N Number

In mathematics, the Fibonacci numbers or Fibonacci series or Fibonacci sequence are the numbers in the following integer sequence:

By definition, the first two numbers in the Fibonacci sequence are 0 and 1, and each subsequent number is the sum of the previous two.
In mathematical terms, the sequence Fn of Fibonacci numbers is defined by the recurrence relation


package com.crunchify.tutorials;
import java.util.Scanner;
/**
* @author Crunchify.com
*/
public class CrunchifyFibonacci {
@SuppressWarnings("resource")
public static void main(String args[]) {
//input to print Fibonacci series upto how many numbers
System.out.print("Enter number upto which Fibonacci series to print: ");
int number = new Scanner(System.in).nextInt();
System.out.println("\n\nFibonacci series upto " + number +" numbers : ");
//printing Fibonacci series upto number
for(int i=1; i<=number; i++){
System.out.print(fibonacciRecusion(i) +" ");
}
}
// Java program for Fibonacci number using recursion.
public static int fibonacciRecusion(int number){
if(number == 1 || number == 2){
return 1;
}
return fibonacciRecusion(number-1) + fibonacciRecusion(number -2); //tail recursion
}
// Java program for Fibonacci number using Loop.
public static int fibonacciLoop(int number){
if(number == 1 || number == 2){
return 1;
}
int fibo1=1, fibo2=1, fibonacci=1;
for(int i= 3; i<= number; i++){
fibonacci = fibo1 + fibo2; //Fibonacci number is sum of previous two Fibonacci number
fibo1 = fibo2;
fibo2 = fibonacci;
}
return fibonacci; //Fibonacci number
}
}
|
1
2
3
4
|
Enter number upto which Fibonacci series to print: 15
Fibonacci series upto 15 numbers :
1 1 2 3 5 8 13 21 34 55 89 144 233 377 610
|
Step By Step Guide for Windows Server 2008 Domain Controller and DNS Server Setup
This tutorial will explain how to setup Windows Server 2008 Domain Controller and DNS
Server.
Click on Start > Run

Now type dcpromo > Click OK

The system will start checking if Active Directory Domain Services ( AD DS) binaries are installed, then will start installing them. The binaries could be installed if you had run the dcpromo command previously and then canceled the operation after the binaries were installed.


The Active Directory Domain Services Installation Wizard will start, either enable the checkbox beside Use Advanced mode installation and Click Next , or keep it unselected and click on Next

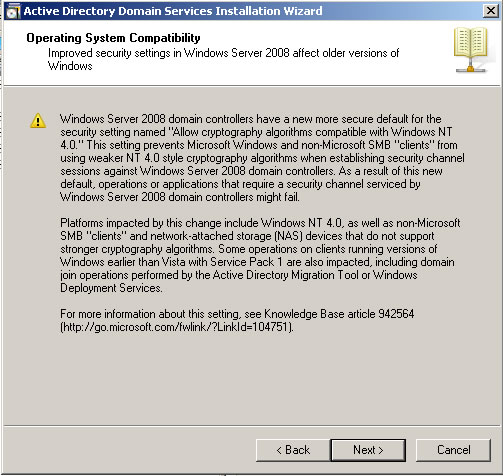
The Operating System Compatibility page will be displayed, take a moment to read it and click Next

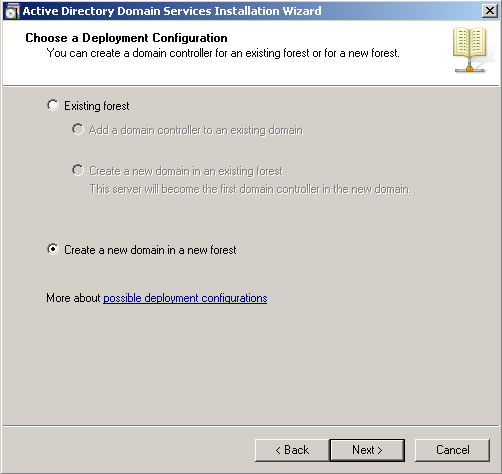
Choose Create a new domain in a new forest, Click Next

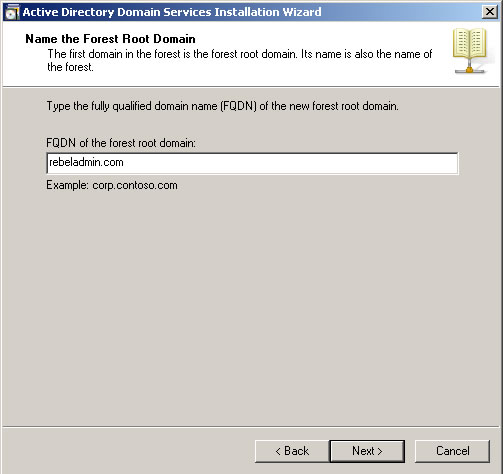
Enter the Fully Qualified Domain Name of the forest root domain inside the textbox, click Next

If you selected Use advanced mode installation on the Welcome page, the Domain NetBIOS Name page appears. On this page, type the NetBIOS name of the domain if necessary or accept the default name and then click Next.

Select the Forest Functional Level, choose the level you desire and click on Next.

Make sure to read the description of each functional level to understand the difference between each one.
In the previous step, If you have selected any Forest Functional Level other than windows Server 2008 and clicked on Next , you would then get a page to select the domain Functional Level. Select it and then click on Next

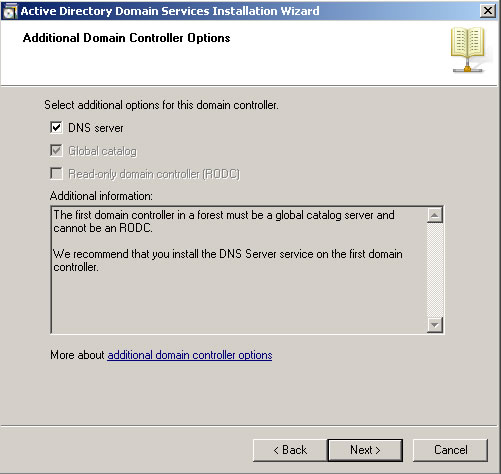
In the Additional Domain Controller Options page, you can select to install the domain Name Service to your server. Note that the First domain controller in a forest must be a Global Catalog that’s why the checkbox beside Global Catalog is selected and it cannot be cleared. The checkbox is also selected by default when you install an additional domain controller in an existing domain, however you can clear this checkbox if you do not want the additional domain controller to be a global catalog server. The first domain controller in a new forest or in a new domain can not be a Read Only Domain Controller (RODC), you can later add a RODC but you must have at least one Windows Server 2008 Domain Controller.
I want to set my DC as a DNS Server as well, so I will keep the checkbox beside DNS server selected and click on Next

If you don’t have static ip assigned to your server you will see similar to the following screen now you need to assign static ip and start the above process.

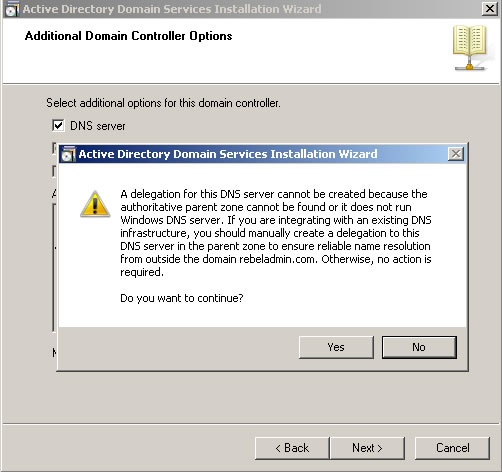
If the wizard cannot create a delegation for the DNS server, it displays a message to indicate that you can create the delegation manually. To continue, click Yes

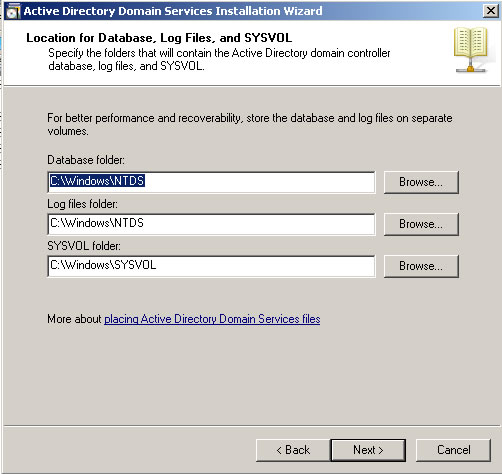
Now you will have the location where the domain controller database, log files and SYSVOL are stored on the server.
The database stores information about the users, computers and other objects on the network. the log files record activities that are related to AD DS, such information about an object being updated. SYSVOL stores Group Policy objects and scripts. By default, SYSVOL is part of the operating system files in the Windows directory either type or browse to the volume and folder where you want to store each, or accept the defaults and click on Next

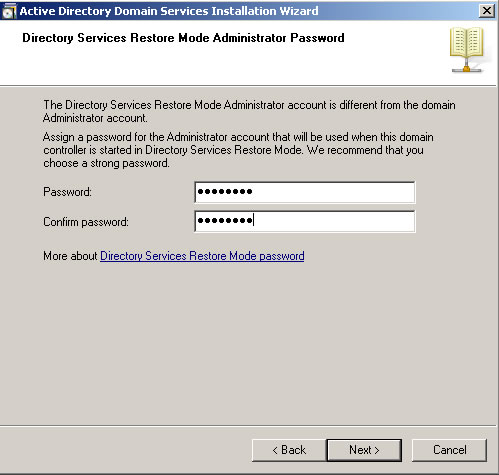
In the Directory Services Restore Mode Administrator Password (DSRM) page, write a password and confirm it. This password is used when the domain controller is started in Directory Services Restore Mode, which might be because Active Directory Domain services is not running, or for tasks that must be performed offline.Make sure that you memorize this password when you need it.

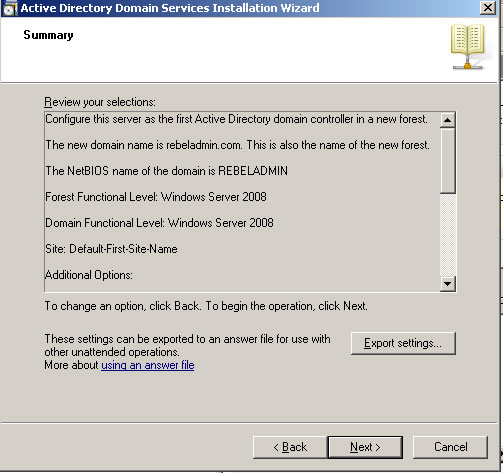
Summary page will be displayed showing you all the setting that you have set . It gives you the option to export the setting you have setup into an answer file for use with other unattended operations, if you wish to have such file, click on the Export settings button and save the file.

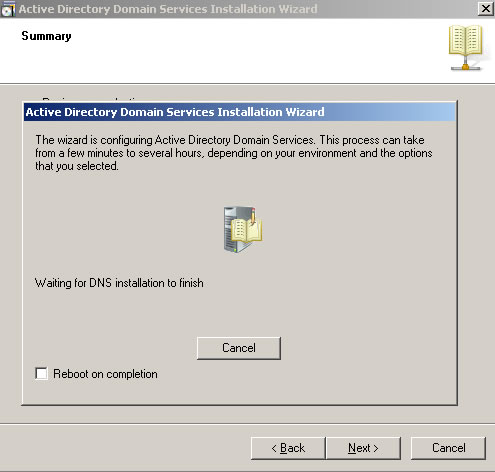
DNS Installation will start

Followed by installing Group Policy Management Console, the system will check first if it is installed or not.


Configuring the local computer to host active directory Domain Services and other operations will take place setting up this server as a Domain Controller active Directory Domain Services installation will be completed, click Finish.

Click on Restart Now to restart your server for the changes to take effect.

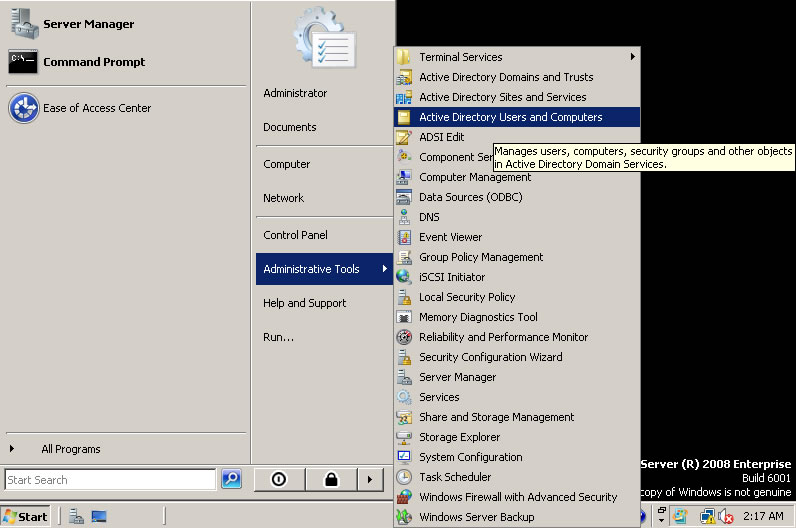
Once the server is booted and you logon to it, click on Start > Administrative Tools
you will notice that following have been installed :
Active Directory Domains and Trusts
Active Directory Sites and Services
Active Directory Users and Computers
ADSI Edit
DNS
Group Policy Management

That’s it now your new win server 2008 domain controller with dns server setup was completed.
Server.
Click on Start > Run
Now type dcpromo > Click OK
The system will start checking if Active Directory Domain Services ( AD DS) binaries are installed, then will start installing them. The binaries could be installed if you had run the dcpromo command previously and then canceled the operation after the binaries were installed.
The Active Directory Domain Services Installation Wizard will start, either enable the checkbox beside Use Advanced mode installation and Click Next , or keep it unselected and click on Next
The Operating System Compatibility page will be displayed, take a moment to read it and click Next
Choose Create a new domain in a new forest, Click Next
Enter the Fully Qualified Domain Name of the forest root domain inside the textbox, click Next
If you selected Use advanced mode installation on the Welcome page, the Domain NetBIOS Name page appears. On this page, type the NetBIOS name of the domain if necessary or accept the default name and then click Next.
Select the Forest Functional Level, choose the level you desire and click on Next.
Make sure to read the description of each functional level to understand the difference between each one.
In the previous step, If you have selected any Forest Functional Level other than windows Server 2008 and clicked on Next , you would then get a page to select the domain Functional Level. Select it and then click on Next
In the Additional Domain Controller Options page, you can select to install the domain Name Service to your server. Note that the First domain controller in a forest must be a Global Catalog that’s why the checkbox beside Global Catalog is selected and it cannot be cleared. The checkbox is also selected by default when you install an additional domain controller in an existing domain, however you can clear this checkbox if you do not want the additional domain controller to be a global catalog server. The first domain controller in a new forest or in a new domain can not be a Read Only Domain Controller (RODC), you can later add a RODC but you must have at least one Windows Server 2008 Domain Controller.
I want to set my DC as a DNS Server as well, so I will keep the checkbox beside DNS server selected and click on Next
If you don’t have static ip assigned to your server you will see similar to the following screen now you need to assign static ip and start the above process.
If the wizard cannot create a delegation for the DNS server, it displays a message to indicate that you can create the delegation manually. To continue, click Yes
Now you will have the location where the domain controller database, log files and SYSVOL are stored on the server.
The database stores information about the users, computers and other objects on the network. the log files record activities that are related to AD DS, such information about an object being updated. SYSVOL stores Group Policy objects and scripts. By default, SYSVOL is part of the operating system files in the Windows directory either type or browse to the volume and folder where you want to store each, or accept the defaults and click on Next
In the Directory Services Restore Mode Administrator Password (DSRM) page, write a password and confirm it. This password is used when the domain controller is started in Directory Services Restore Mode, which might be because Active Directory Domain services is not running, or for tasks that must be performed offline.Make sure that you memorize this password when you need it.
Summary page will be displayed showing you all the setting that you have set . It gives you the option to export the setting you have setup into an answer file for use with other unattended operations, if you wish to have such file, click on the Export settings button and save the file.
DNS Installation will start
Followed by installing Group Policy Management Console, the system will check first if it is installed or not.
Configuring the local computer to host active directory Domain Services and other operations will take place setting up this server as a Domain Controller active Directory Domain Services installation will be completed, click Finish.
Click on Restart Now to restart your server for the changes to take effect.
Once the server is booted and you logon to it, click on Start > Administrative Tools
you will notice that following have been installed :
Active Directory Domains and Trusts
Active Directory Sites and Services
Active Directory Users and Computers
ADSI Edit
DNS
Group Policy Management
That’s it now your new win server 2008 domain controller with dns server setup was completed.
Step-By-Step: Active Directory Migration from Windows Server 2008 R2 to Windows Server 2012
Prerequisites
Step 1: Preparing your existing forest via the adprep command
Step 3: Verify the new Windows Server 2012 Domain Controller
Step 4: Transferring the Flexible Single Master Operations (FSMO) Role
Step 5: Removing the Windows 2008 R2 domain controller
- Download Windows Server 2012. If you plan on completing this Step-By-Step in a virtual lab, it is recommended to download the FREE Hyper-V Server 2012 first.
- Complete a full backup of your existing server. Better to be safe than sorry.
- Check the Schema version of AD DS (Before adprep) by running regedit, navigating to Computer\HKEY_LOCAL_MACHINE\SYSTEM\CurrentControlSet\services\NTDS\Parameters and noting the current Schema version.
Step 1: Preparing your existing forest via the adprep command
-
Insert the Windows Server 2012 DVD into the DVD drive of the Windows Server 2008 R2 AD DS.
-
Open command prompt, and type adprep /forestprep and press enter.
-
Check the Schema version of AD DS
(After adprep) by running regedit, navigating to
Computer\HKEY_LOCAL_MACHINE\SYSTEM\CurrentControlSet\services\NTDS\Parameters
and noting the current Schema version.
Step 3: Verify the new Windows Server 2012 Domain Controller
- Open Active Directory Users and Computers, expand <Your Domain> and click the Domain Controller OU to verify your server is listed.
- Open DNS Manager, right-click on <Your Domain>, select Properties and then click Name Servers Tab. Verify that your server is listed in Name Servers: lists.
- Open Active Directory Sites and Services; verify that your server is listed in Servers under Default-First-Site-Name.
Step 4: Transferring the Flexible Single Master Operations (FSMO) Role
- Open the Active Directory Users and Computers console on your new Windows Server 2012 computer.
- Right click your domain and select Operations Masters in the sub menu.
- In the Operations Masters window, ensure the RID tab is selected.
- Select the Change button.

- Select Yes when asked about transferring the operations master role.
- Once the operations master role has successfully transferred, click OK to continue.
- Ensure the Operations Master box now shows your new 2012 Windows Server.
- Repeat steps 4 to 6 for the PDC and Infrastructure tabs.
- Once completed, click Close to close the Operations Masters window.
- Close the Active Directory Users and Computers window.

Step 5: Removing the Windows 2008 R2 domain controller
- On the Windows 2008 R2 server click Start, Click Run, type dcpromo, then click OK.
- After the Welcome to the Active Directory Installation Wizard page, be sure to leave the Delete the domain because this server is the last domain controller in the domain unchecked.
- On the Administrator Password Page, enter your password and click Next.
- On the Summary page, click Next, wait for the process to end, then click Finish.
- On the Completing the Active Directory Domain Services Installation Wizard, click Finish.
- On the Active Directory Domain Services Installation Wizard page, click Restart Now to Restart the server.
- After the reboot is completed, delete the Windows Server 2008 R2 server from the domain to a workgroup and remove any unnecessary record from Active Directory Sites and Services.
Step by Step guide to setup Active Directory on Windows Server 2008
This tutorial will explain how to install AD on server 2008. This will valid for windows 2008 R2 as well.
Requirement:
Minimum: Single processor with 1.4 GHz (x64 processor) or 1.3GHz (Dual Core)
Minimum: 512 MB RAM
Minimum: 32 GB or greater
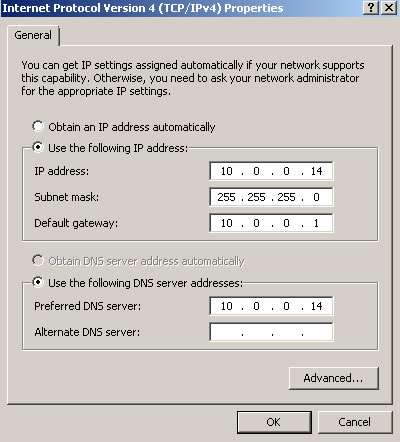
In here the server ip is 10.0.0.14. Since we going to make it as DNS server too you should use the same ip as the preferred DNS server.

After that you will need to do a reboot.

Password : XXXXXXXX
Hope this tutorial is clear for you guys. If any question please ask me
Requirement:
Minimum: Single processor with 1.4 GHz (x64 processor) or 1.3GHz (Dual Core)
Minimum: 512 MB RAM
Minimum: 32 GB or greater
- The first step is to assign a ip to the server that you going to deploy the AD. Its nessary to install it as DNS server too. So its better to have fixed ip it doesn't mean you cannot install AD without fixed ip address but it will solve lot of issues if you used fixed ip.
In here the server ip is 10.0.0.14. Since we going to make it as DNS server too you should use the same ip as the preferred DNS server.
- Next step is to install the Active directory roles. Unlikely the older version of windows servers Microsoft highly recommend to use server manager option to install roles before you run dcpromo.
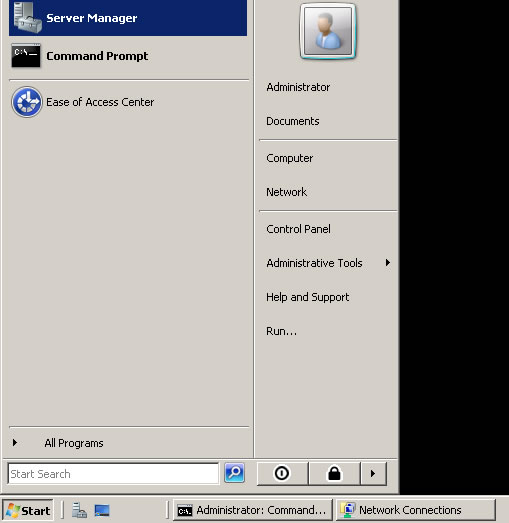
- Click on start menu and select the Server Manager
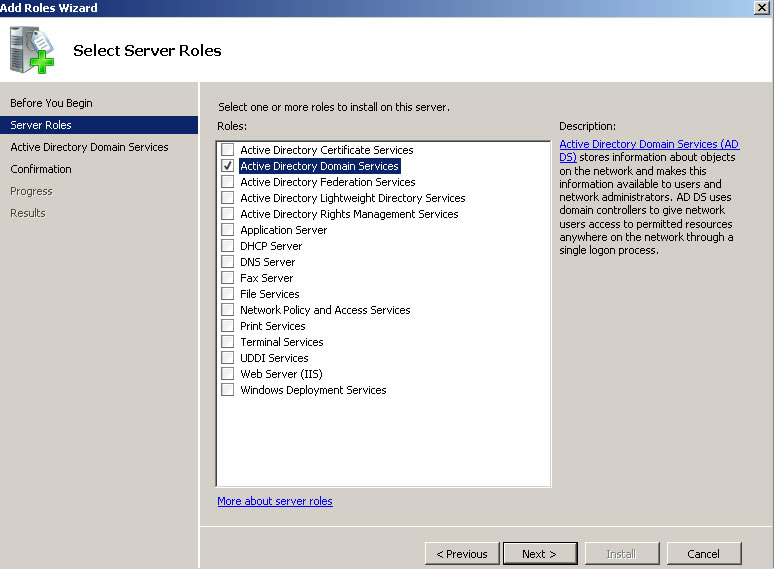
- Select the roles from the right hand panel and click on add roles option.
- From the roles list select the "Active Directory Domain Services" role and Click "Next"
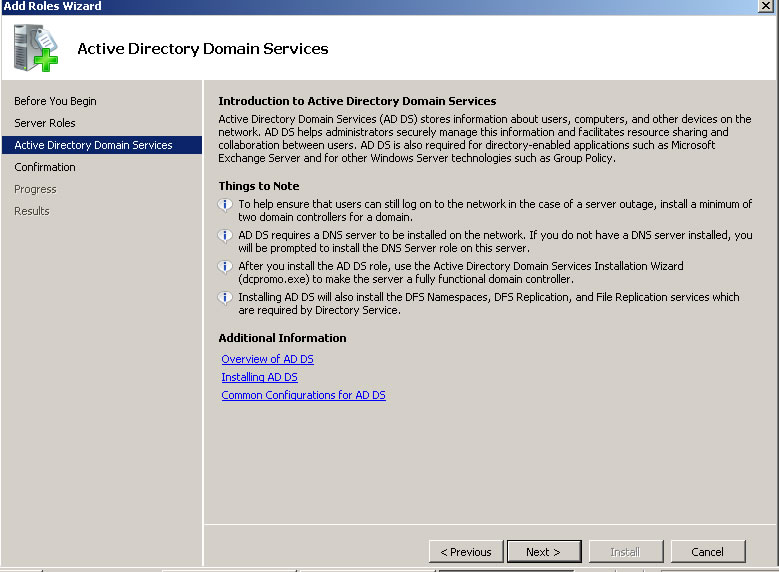
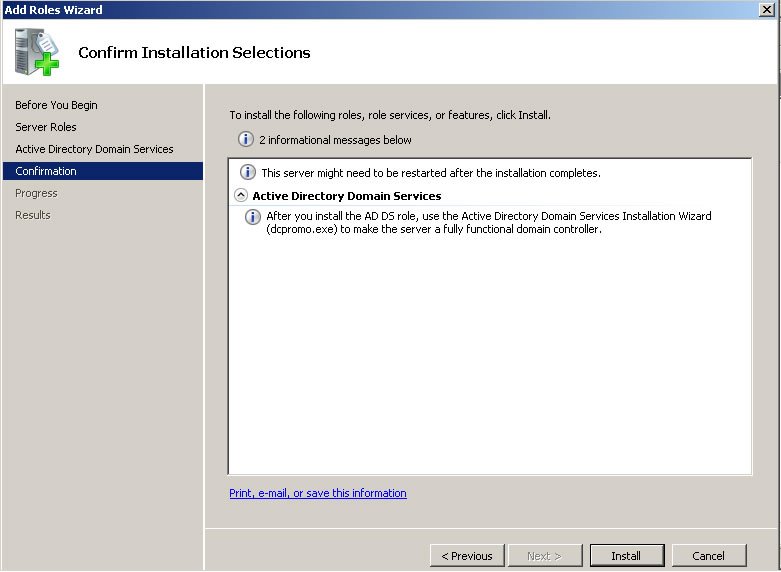
- Review the confirmation and click on "Next"
- Review the installation confirmation and click on "Next"
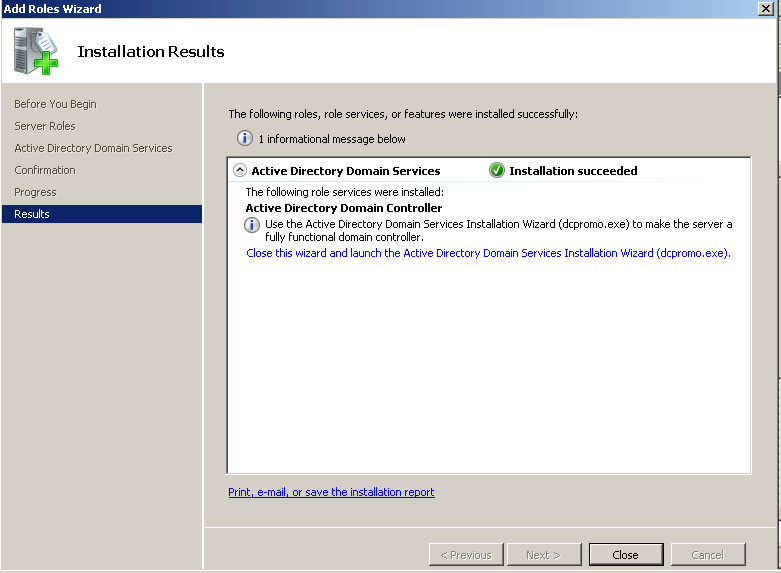
- It will take few minutes to complete and when its done you will get this confirmation. And then click on "Close"
After that you will need to do a reboot.
-
After reboot please open up the "server Manager" again. And then click on "Roles" there you will see the "Active Directory Domain Services" is successfully installed in there. click on it then you will get a window like below.
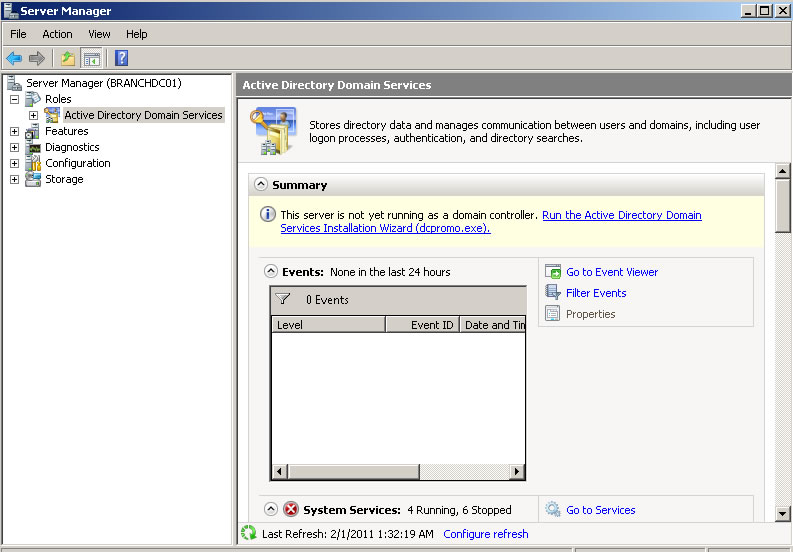
In their please pay attention to the message

So please click on that link and it will start the DCPROMO wizard.
- So next step to go through the DC promo wizard.
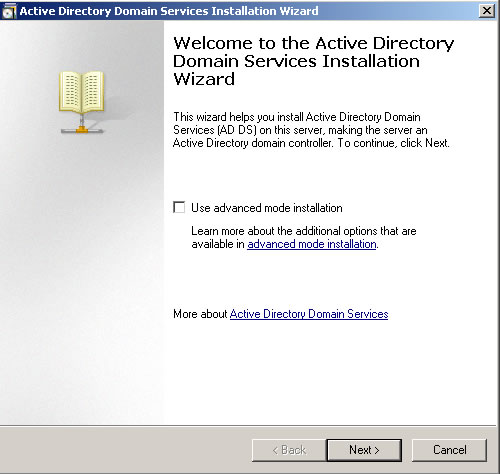
- To start the installation click on "Next"
- Click on "Next"
- Since we going to install New domain Controller in new forest please select the option "Create a new domain in new forest" option and click on "Next"
- Now we have to provide the name for our domain controller. It must be FQDN. In our case I used rebeladmin.com as the domain. Please click "Next" after it.
- In this window it will ask to select forest function level. If you going to add server 2003 domain controller to your forest later don't select the function level as server 2008. If you going to use full features of 2008 Ad you must select forest function level as server 2008. In my case I used server 2008. Click on "Next" after the select.
- In next window since it's the first DC we should make it as DNS server too. Leave the default selection and click on "Next"
- If the wizard cannot create a delegation for the DNS server, it displays a message to indicate that you can create the delegation manually. To continue, click "Yes"
- In next window it will show up the database location. It its going to be bigger AD its good if you can keep NTDS database in different partition. Click on "Next" after changes.
- In next window its asking to define a restore mode password. Its more important if you had to do a restore from backup in a server crash. Click on "Next" after filling it.
- Next window is giving you a brief of the installation. Click on "Next"
- Then it will start the installation of the AD. It will take some time to complete. After complete of the installation perform a server reboot.
- After the reboot now you can login to the domain. Please use the login as following example
Password : XXXXXXXX
- Now its done and you can view the active directory options on administrative tools menu
Hope this tutorial is clear for you guys. If any question please ask me
Step by Step guide to setup Active Directory on Windows Server 2008
This tutorial will explain how to install AD on server 2008. This will valid for windows 2008 R2 as well.
Requirement:
Minimum: Single processor with 1.4 GHz (x64 processor) or 1.3GHz (Dual Core)
Minimum: 512 MB RAM
Minimum: 32 GB or greater
In here the server ip is 10.0.0.14. Since we going to make it as DNS server too you should use the same ip as the preferred DNS server.
After that you will need to do a reboot.
Password : XXXXXXXX
Hope this tutorial is clear for you guys. If any question please ask me on rebeladm@live.com
Requirement:
Minimum: Single processor with 1.4 GHz (x64 processor) or 1.3GHz (Dual Core)
Minimum: 512 MB RAM
Minimum: 32 GB or greater
- The first step is to assign a ip to the server that you going to deploy the AD. Its nessary to install it as DNS server too. So its better to have fixed ip it doesn't mean you cannot install AD without fixed ip address but it will solve lot of issues if you used fixed ip.
In here the server ip is 10.0.0.14. Since we going to make it as DNS server too you should use the same ip as the preferred DNS server.
- Next step is to install the Active directory roles. Unlikely the older version of windows servers Microsoft highly recommend to use server manager option to install roles before you run dcpromo.
- Click on start menu and select the Server Manager
- Select the roles from the right hand panel and click on add roles option.
- From the roles list select the "Active Directory Domain Services" role and Click "Next"
- Review the confirmation and click on "Next"
- Review the installation confirmation and click on "Next"
- It will take few minutes to complete and when its done you will get this confirmation. And then click on "Close"
After that you will need to do a reboot.
-
After reboot please open up the "server Manager" again. And then click on "Roles" there you will see the "Active Directory Domain Services" is successfully installed in there. click on it then you will get a window like below.
In their please pay attention to the message
So please click on that link and it will start the DCPROMO wizard.
- So next step to go through the DC promo wizard.
- To start the installation click on "Next"
- Click on "Next"
- Since we going to install New domain Controller in new forest please select the option "Create a new domain in new forest" option and click on "Next"
- Now we have to provide the name for our domain controller. It must be FQDN. In our case I used rebeladmin.com as the domain. Please click "Next" after it.
- In this window it will ask to select forest function level. If you going to add server 2003 domain controller to your forest later don't select the function level as server 2008. If you going to use full features of 2008 Ad you must select forest function level as server 2008. In my case I used server 2008. Click on "Next" after the select.
- In next window since it's the first DC we should make it as DNS server too. Leave the default selection and click on "Next"
- If the wizard cannot create a delegation for the DNS server, it displays a message to indicate that you can create the delegation manually. To continue, click "Yes"
- In next window it will show up the database location. It its going to be bigger AD its good if you can keep NTDS database in different partition. Click on "Next" after changes.
- In next window its asking to define a restore mode password. Its more important if you had to do a restore from backup in a server crash. Click on "Next" after filling it.
- Next window is giving you a brief of the installation. Click on "Next"
- Then it will start the installation of the AD. It will take some time to complete. After complete of the installation perform a server reboot.
- After the reboot now you can login to the domain. Please use the login as following example
Password : XXXXXXXX
- Now its done and you can view the active directory options on administrative tools menu
Hope this tutorial is clear for you guys. If any question please ask me on rebeladm@live.com
Subscribe to:
Posts (Atom)